Bat House With Slate Exterior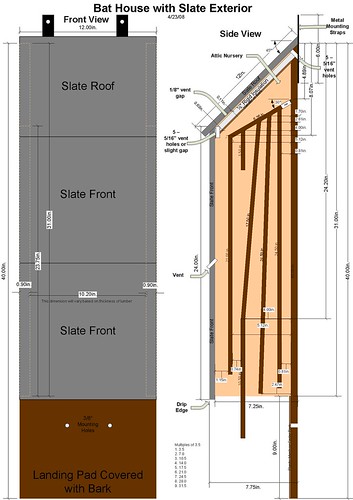
Image by yaquina
Here is the plan for a bat house that I designed. I built two of them and placed them at a nearby wildlife refuge (with the blessing of the refuge manager).
Design features:
- The top and front are made from slate floor tiles ( each at Home Depot). There are several reasons for using slate (vs. wood):
- It requires no maintenance (painting). It is already the right color for our area (dark) and does not need paint for weather protection.
- It warms quickly in sunlight, warming the house in the morning.
- It provides thermal mass, holding heat into the night.
- The landing pad is covered with a flattened piece of bark. Bark looks natural, and provides the roughness that the bats need for landing. After gluing the bark to the landing pad, I gave it several coats of exterior varnish to make it last longer.
- The design incorporates two ventilation features:
- A vent between the two front slates. This allows for some air circulation which the bats need on hot days. This is a fairly standard feature in recent bat house designs.
- A vent just under the slate roof. Air is drawn through a small gap between the rigid insulation and the upper front slate, and exits through five screened holes drilled in the back, very near the top of the house. This allows some air flow at the front crevice, even at the top of the crevice, and at the bottom of the nursery area. It also allows air flow under the roof slate, mimicking a slate roof. I am not an expert on slate roofs but I know most roof undersides need to allow for airflow to avoid water condensation on the underside of the roof.
- Some of the partitions are slanted because there is some research in our area showing that our bat species prefer a wedge-shape instead of an entirely vertical partition.
- The rigid insulation holds heat in the house from below, and reduces heat coming down from the roof on sunny days. This makes the bat house temperature more stable, and warmer at night, which most bats prefer.
- The design includes an "attic nursery", designed to meet the needs of mother bats with newborns. The mothers and pups like a temperature of around 90-100 degrees. The sloped attic floor should be a litte more forgiving for clumsy infants, vs. a vertical surface which if they lose their grip would drop them to the ground where they would be helpless and die. The down side of a non-vertical surface is that guano may accumulate here. But it does have some slope and guano is light, so most of it should get knocked out and fall to the ground. But we'll have to see what happens.
- I glued rough material (bark in one house, sisal rope in the other) to the roof of the attic so the bats could hang from the ceiling of the nursery area. The rope turned out to be a bad idea, though I did eventually get it to work. A piece of pet netting would work fine.
- I opted to extend one partition below the bottom of the house. This was mainly due to the dimensions of the wainscoting (which is 3.5" wide) - I did not want to have to rip any of it. But I also wanted to see if the bats would use this partition for landing and taking off.
- I melted wax onto the entire outer wood surfaces, for the following reasons:
- No maintenance. Wax never needs to be painted. The wax will dry out eventually, but that will take at least 15 years I would guess.
- As it weathers, the wax darkens the wood, to the color that is appropriate for our climate.
- The weathered wax finish will blend in well with the dead trees upon which the houses are mounted.
- On really hot days the wax melts, flowing into every little crack and knot in the wood. Any excess wax just drips off.
- Most waterproofing finishes are a form of dissolved wax, so when you put a waterproofer on your deck you are really just putting down mainly dissolved wax. I have experimented with melting wax directly into cedar, and have had good results (though it is very labor intensive). To get the same amount of wax into the wood with a waterproofing seal, I would have to put on many, many coats. Also this wax would not reflow on hot days, and waterproofer really only lasts about a year.
The total material cost for this house is a little over . The only special tool required was a tile saw to cut 45 degree bevels on the slates, but those are not completely necessary.
If I build more of these I think I will flatten the slope of the roof a bit so I can fit in one more partition. The front partition gap is a little bigger than I like (1.15").
King of your Castle!!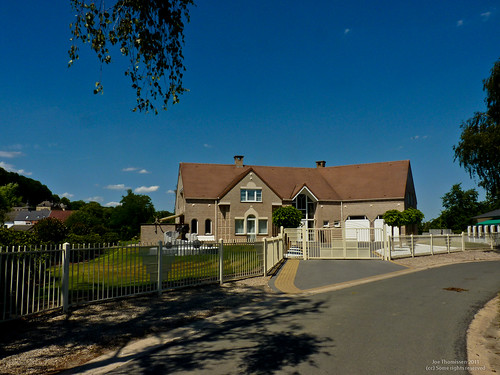
Image by Joe Thomissen
Exterior house design
Brick-House
Image by ARNOLD Masonry and Concrete
www.arnoldmasonryandconcrete.com/
ARNOLD Masonry and Concrete is your Premier Hardscape, Landscape, and Home Renovation Contractor Firm. Serving Atlanta, Buckhead and North Atlanta since 1985 we take great pride in our ability to offer you superior service, products, and knowhow.
HARDSCAPE
Over 27 years as expert custom contractors in Stonescape /Hardscape creating outdoor living spaces, fireplaces and pits, outdoor kitchens and grill enclosures, custom pools, patios, elevated patios and decks, walkways, decorative and retaining walls, columns and entranceways, fencing, custom spiral stairs, all forms of concrete and much more incorporating the best materials available necessary for the fulfillment of the richest hardscape design.
LANDSCAPE and WATER FEATURES
Whether you’re desiring a breath of fresh air to your present landscape or a complete overhaul, ARNOLD Masonry and Concrete’s arborists and horticultural experts will bring forth a gorgeous renovation to your home with the use of countless varieties and species of plants/trees/shrubs and flowers. ~ Our custom water features range from full size swimming pools to natural stone ponds and pondless waterfalls. We also specialize in fountains. From a custom rustic design to a sleek formal design (or a combination) we pride ourselves in giving you the best in creativity and workmanship along with immediate, top quality service.
HOME RENOVATION
ARNOLD Masonry and Concrete’s custom Home and indoor living space renovations include custom elevated patios and decks, room additions, interior post and beam construction, fireplaces, kitchen and bath renovations, basements, bars and even wine cellars always tying in masonry, stone, brick, and similar products as well as rich wood products.~ For exterior home renovations we will match your existing home façade or construct a new facelift, whether it be brick or stone as well as Hardscape materials /siding to stucco and finalize it all down to paint and even gutters. Our goal is to be your all inclusive construction company allowing you a worry free construction environment.
SCOTT R. ARNOLD
EMAIL ~ sales@arnoldmasonryandconcrete.com
OFFICE~ 770.345.2686
This incredible house was featured in WIRED magazine!
Image by jonrawlinson
read about this house in WIRED: www.wired.com/wired/archive/15.01/home4.html
Beach living isn't for wimps. Even around LA, the days are hot and the sea breezes can be bone-chilling. Most oceanfront homes here are heated and cooled with traditional ozone-depleting systems. But when architect David Hertz designed the three-story Panel House for Thomas Ennis, he found a cooler solution: In place of walls, he installed industrial refrigerator panels. When the house gets cool – or warm – it stays that way. Now Ennis lives in a very large, very comfortable thermos.
INSULATED PANELS
The 30-foot-tall by 30-inch-wide refrigerator panels – each 6 inches thick – have a foam core, an aluminum skin, and an insulation rating about four times greater than any residential wall. The exterior side of the panels is coated with industrial paint that lasts up to 40 years and requires almost no maintenance. Because they're prefab and don't need wood framing, the panels also saved a few trees and eliminated a lot of onsite-construction waste.
THERMOSTAT
A networked control system with outdoor and in-floor sensors takes the temp, then adjusts the heat.
SMART GLASS
The house is a west-facing glass box – a recipe for greenhouse-like warmth and glare. A reflective film cuts heat and blocks low sun, while a low-emissivity coating helps keep the house warm at night.
FIRE PIT
The pit, filled with curls of recycled metal from Ennis' fabricating plant, burns natural gas.
ELEVATOR
A pneumatic, glass-enclosed elevator modeled after a vacuum mail tube – more energy efficient than a hydraulic or electric model – shuttles from basement to roof.
CLEANER WASHER
An automated window-washing system uses reverse osmosis to purify H20 so mineral deposits don't leave spots. Wastewater from the process flows to a cistern, where it mixes with collected storm water and runoff. The resulting gray water is used for landscaping.
AUTOMATIC WINDOWS
Living room windows are mounted on a motorized gear system that lowers all but 3 feet of the glass and surrounding panels into the basement, opening the house to cool breezes. When windows are closed, an inner tube-like seal inflates around them; when they slide open, the seal deflates.
SURF CAM
A rooftop webcam lets Ennis' friends log on to check conditions before heading to the beach.
– Janelle Brown
How To: Deflect the Glare
A home office that faces south is a mixed blessing: You want the natural light, but the rays are harsh on your screen. cut the glare by installing light shelves. These platforms mount on the inside casing of a window and reflect beams toward the ceiling, creating indirect glow.
1. Make a light shelf the width of your window from specialty construction plywood and paint it white.
2. Affix a mirror or piece of polished, galvanized steel to the top surface. Steel provides more even illumination. Watch out for areas of intense heat – over time they can burn.
3. Paint your ceiling white, all the better for photons to bounce around your workspace.
4. Hinges are a helpful option, letting you drop the shelf when the summer heat becomes too great. Why save on lighting only to pay more on cooling?
Transfering the design to the sign material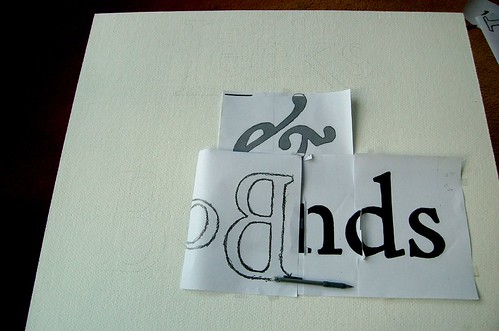
Image by Leeks 'N' Bounds
For the sign material, Hardie-Backer was used. Hardie-Backer is Portland cement mixed with woodfiber. The backer board is used as a tile substrate, but Hardie also makes Hardie-Plank which is cement siding for your house. It's a terrific alternative to vinyl - it holds paint well and doesn't give people cancer or hurt the environment like the vinyl siding industry does.
Where was I?
Oh yeah, Hardie-Backer. It's water resistant and holds paint very well. I primed it with exterior latex primer and then 2 coats of exterior latex paint, both sides to seal the board.
Next, the design was printed in full-size from Adobe Illustrator. The paper was taped together and the backs of the letters outlined in soft 6B pencil. The paper sign was taped down and then the letters outlined on the "right" side with a hard (2H) pencil. This transfers the carbon on the back of the paper to the board.
View larger to see the pencil outline better.
Photo, design and sign creation by Jennifer Dickert
No comments:
Post a Comment